การพัฒนาแอพพลิเคชั่น ข้อแนะนำคือควรทำ Unit Tests มองการพัฒนาในระยะยาว หากต้องมีการแก้ไข issue เล็กน้อย แต่ไม่แน่ใจว่าจะเกิด defect กับระบบเดิมหรือไม่ การมี unit tests ช่วยประหยัดเวลาการ regression tests ได้เยอะมาก และคุณจะเห็นประโยชน์ของการทำ Unit tests อย่างแน่นอน
รู้จัก @RestController annotation สร้าง routes RESTful API
annotation @RestController implement มาจาก @Controller ของ spring web เพื่อใช้งานสำหรับการสร้าง RESTful API (ไม่ใช่ static view) เพิ่มความสะดวกในการพัฒนา RESTful API ให้ง่ายยิ่งขึ้น
ตัวอย่างการสร้าง Route (text/plain)
package com.poolsawat.starter.controller;

import org.springframework.web.bind.annotation.RequestMapping;
import org.springframework.web.bind.annotation.RestController;

@RestController
public class HelloController {

	@RequestMapping("/")
	public String index() {
		return "Greetings from Spring Boot!";
	}

}
ทดสอบ http://localhost:8080/
Greetings from Spring Boot!เพิ่ม Route (application/json)
...
	@RequestMapping("/domain")
	public String[] json() {
		return new String[] {"www",".","poolsawat",".","com"};
	}
...
restart server จากนั้น ทดสอบ http://localhost:8080/domain
[
  "www",
  ".",
  "poolsawat",
  ".",
  "com"
]
เพิ่ม Test Dependencies ใน POM
ก่อนที่จะเริ่มเขียน Unit Tests จำเป็นต้องเพิ่ม “spring-boot-starter-test” เข้าไปที่ไฟล์ POM (ไฟล์ pom.xml) มาเพิ่มกันเลย
...
<dependencies>
	...
		<dependency>
			<groupId>org.springframework.boot</groupId>
			<artifactId>spring-boot-starter-test</artifactId>
			<scope>test</scope>
			<exclusions>
				<exclusion>
					<groupId>org.junit.vintage</groupId>
					<artifactId>junit-vintage-engine</artifactId>
				</exclusion>
			</exclusions>
		</dependency>
	...
</dependencies>
...
สร้าง src/test/java/com/poolsawat/starter/controller/HelloControllerTest.java
package com.poolsawat.starter.controller;

import static org.hamcrest.Matchers.equalTo;
import static org.springframework.test.web.servlet.result.MockMvcResultMatchers.content;
import static org.springframework.test.web.servlet.result.MockMvcResultMatchers.status;

import org.junit.jupiter.api.Test;
import org.springframework.beans.factory.annotation.Autowired;
import org.springframework.boot.test.autoconfigure.web.servlet.AutoConfigureMockMvc;
import org.springframework.boot.test.context.SpringBootTest;
import org.springframework.http.MediaType;
import org.springframework.test.web.servlet.MockMvc;
import org.springframework.test.web.servlet.request.MockMvcRequestBuilders;

@SpringBootTest
@AutoConfigureMockMvc
public class HelloControllerTest {
	@Autowired
	private MockMvc mvc;

	@Test
	public void getHello() throws Exception {
		mvc.perform(MockMvcRequestBuilders.get("/")
				.accept(MediaType.APPLICATION_JSON))
				.andExpect(status().isOk())
				.andExpect(content().string(equalTo("Greetings from Spring Boot!")));
	}
	@Test
	public void getDomain() throws Exception {
		mvc.perform(MockMvcRequestBuilders.get("/domain")
				.accept(MediaType.APPLICATION_JSON))
				.andExpect(status().isOk())
				.andExpect(content().json("[\"www\",\".\",\"poolsawat\",\".\",\"com\"]"));
	}
}
อธิบายการทำงาน
- @SpringBootTest inject annotation Test เพื่อเริมการ Test
- @AutoConfigureMockMvc inject annotation AutoConfiMockMVC (MockMVC มีหน้าที่สำหรับทำ Unit Tests มี feature mockup data)
- @Autowired เป็นการ auto inject MockMVC bean ก่อนการจะเรียกใช้งานใน Testcase
- @Test ระบุที method บอกให้รู้ว่า รันเคส method นี้
- mvn.perform mockup route ที่ต้องการทดสอบ ระบุ MockMvcRequestBuilders.get(“/”) หมายถึง (“localhost:8080/”) ตรวจสอบ content-type คือต้องเป็น “MediaType.APPLICATION_JSON” กำหนดให้เป็น application/json เท่านั้น
- andExpect
- .andExpect(status().isOk()) expect htto status code OK (status code 200) หากไม่ใช่จะ fail ทันที
- .andExpect(content().string(equalTo(“Greetings from Spring Boot!”))) expect content body ต้องเป็นคำว่า “Greetings from Spring Boot!” หากไม่ใช่จะ fail ทันที
จากนั้นสร้าง maven test build
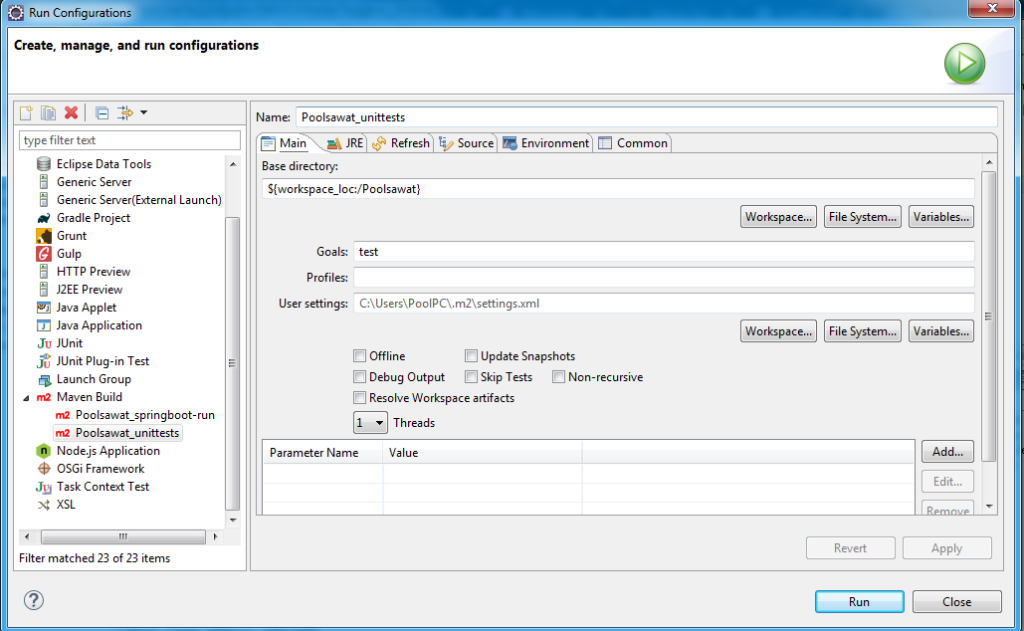
ตรวจสอบที่ console panel
[INFO]
[INFO] -------------------------------------------------------
[INFO]  T E S T S
[INFO] -------------------------------------------------------
[INFO] Running com.poolsawat.starter.controller.HelloControllerTest
...
[INFO] Tests run: 2, Failures: 0, Errors: 0, Skipped: 0, Time elapsed: 3.606 s - in com.poolsawat.starter.controller.HelloControllerTest
2020-10-15 10:57:54.262  INFO 5864 --- [extShutdownHook] o.s.s.concurrent.ThreadPoolTaskExecutor  : Shutting down ExecutorService 'applicationTaskExecutor'
[INFO]
[INFO] Results:
[INFO]
[INFO] Tests run: 2, Failures: 0, Errors: 0, Skipped: 0
[INFO]
[INFO] ------------------------------------------------------------------------
[INFO] BUILD SUCCESS
[INFO] ------------------------------------------------------------------------
[INFO] Total time: 7.231 s
[INFO] Finished at: 2020-10-15T10:57:54+07:00
[INFO] Final Memory: 18M/220M
[INFO] ------------------------------------------------------------------------
ในทุกครั้งที่มีการแก้ไข java code จำเป็นต้องมีการ restart web server spring boot มี hot reload (การ auto restart web server เมื่อมี code change)
เพิ่ม “spring-boot-devtools”
...
<dependency>
	<groupId>org.springframework.boot</groupId>
	<artifactId>spring-boot-devtools</artifactId>
	<optional>true</optional>
</dependency>
...
จากนั้นทำการ restart อีกครั้ง ต่อไปเวลาแก้ไข code ก็จะไม่ต้อง restart เองแล้ว
สรุปท้ายบทความ
การพัฒนาแอพพลิเคชั่นที่มี Test ถือว่าเป็นแอพพลิเคชั่นที่ดี ข้อดีของการทำ Test มีเยอะมากช่วยลดเวลาการ Regression Test ได้เยอะ ถ้าแอพพลิเคชั่นของคุณยังไม่มี test เริ่มทำได้แล้ว เพราะถ้าไม่ทำคุณจะคุยกับเขา (ทีมพัฒนา แอพพลิเคชั่นที่มี test) ไม่รู้เรื่อง บทความต่อไปจะเป็นเรื่องเกี่ยวกับอะไร คอยติดตามกันนะครับ