เมื่อครั้งงาน Arduino Day 2017 (Bangkok) ที่ผ่านได้ยินทาง Nectec- Thialand ได้มาเชิญชวนให้ใช้ Product ที่พัฒนาโดยคนไทยทางด้าน Cloud Platform Service ที่ชื่อว่า NetPie เขาบอกว่า Product นี้ช่วยให้การพัฒนางานด้าย IOT สะดวกและรวดเร็วยิ่งขึ้น

Netpie Features
- THING-CENTRIC DEVELOPMENT เป็นเสมือนศุนย์กลางเพื่อใช้ในการรับส่งข้อมูลกัน
- IDENTITY MANAGEMENT สามารถเข้าถึง Netpie โดยไม่จำเป็นว่า Client จะมี IP หรือไม่มีก็ได้
- DYNAMIC AUTHORIZATION สามารถปรับเปลี่ยนการเข้าถึงข้อมูลแบบไดนามิก
- TRANSPARENT CONNECTIVITY การติดต่อสื่อสากันระหว่าอุปกรณ์สามารถทำได้เสมือนความรู้สึกแบบ end-to-end
- SERVICE-ORIENTED MODEL หากต้องการความช่วยเหลือให้นุกถึง Netpie
- TRUE CLOUD ARCHITECTURE มีการออกแบบมาเพื่อให้บริการแบบ Cloud เพื่อให้สามารถขยายขนาดได้ในอนาคต
อ่านข้อมูลเพิ่มเติมได้ที่ https://www.nectec.or.th/innovation/innovation-software/netpie.html
เริ่มต้นการใช้งาน Netpie กับ Esp8266
เตรียมเครื่องมือกันก่อน
- Download Arduino IDE 1.6.9 or later from https://www.arduino.cc/en/Main/Software
- หลังจากติดตั้งสำเร็จ, open Preferences
- เพิ่ม “
http://arduino.esp8266.com/stable/package_esp8266com_index.json" ใส่ในช่อง“Additional Board Manager URLs” กดOK - เปิดเข้าเมนู Boards Manager ค้นหา “esp8266” และติดตั้ง
- ในเมนู Tools เลือก ESP8266 boards
- Download Microgear library จาก https://github.com/netpieio/microgear-esp8266-arduino/archive/master.zip
- เลือกเมนู Sketch => Include Library => Add .zip Library เลือก microgear.zip ที่ Download มาจากข้อ 6.
เมื่อติดตั้งเครื่องมือพร้อมสิ่งที่ต้องทำต่อไปมีด้วยกัน 2 สิ่ง
- ไปสร้าง Project ที่ https://netpie.io/ (ลงทะเบียนฟรี) สมัครสมาชิก เข้าใช้งานระบบ และก็ให้ทำตามขั้นตอนการสร้าง Project จากนี้ https://netpie.io/getstarted
- เขียนโค๊ด
/*  NETPIE ESP8266 basic sample                            */
/*  More information visit : https://netpie.io             */

#include <ESP8266WiFi.h>
#include <MicroGear.h>

const char* ssid     = <WIFI_SSID>;
const char* password = <FILE_PASSWORD>;

#define APPID   <APP_ID>;  //====ได้จากตอนที่เราตั้งชื่อ Project ที่ netpie
#define KEY     <KEY>;  //====จะได้จากตอนสร้าง Key
#define SECRET  <SECRET>;
#define ALIAS   "led1";

WiFiClient client;

int timer = 0;
int i = 1;
MicroGear microgear(client);

int LED = D4;

/* If a new message arrives, do this */
void onMsghandler(char *topic, uint8_t* msg, unsigned int msglen) {
  Serial.print("Incoming message --> ");
  msg[msglen] = '\0';

  char strState[msglen];
  for (int i = 0; i < msglen; i++)
  {
    strState[i] = (char)msg[i];
    Serial.print((char)msg[i]);
  }

  Serial.println();

  String stateStr = String(strState).substring(0, msglen);

  //=========== ช่วงประมวลผลคำสั่ง =============
  Serial.println("stateStr ::== ");
  Serial.println(stateStr);

  if (stateStr == "ON"){
    digitalWrite(LED, HIGH);
    microgear.chat("sw1", "ON");        //==== คำสั่ง chat เพื่อบอกส่งค่าสถานะไปยังหลอด LED บน NETPIE Freeboard
  }else{
    digitalWrite(LED, LOW);
    microgear.chat("sw1", "OFF");       //==== คำสั่ง chat เพื่อบอกส่งค่าสถานะไปยังหลอด LED บน NETPIE Freeboard
  }

  //=========== ช่วงประมวลผลคำสั่ง  =============
}

void onFoundgear(char *attribute, uint8_t* msg, unsigned int msglen) {
  Serial.print("Found new member --> ");
  for (int i = 0; i < msglen; i++)
    Serial.print((char)msg[i]);

  Serial.println();
}

void onLostgear(char *attribute, uint8_t* msg, unsigned int msglen) {
  Serial.print("Lost member --> ");
  for (int i = 0; i < msglen; i++)
    Serial.print((char)msg[i]);
  Serial.println();
}

/* When a microgear is connected, do this */
void onConnected(char *attribute, uint8_t* msg, unsigned int msglen) {
  Serial.println("Connected to NETPIE...");
  /* Set the alias of this microgear ALIAS */
  microgear.setAlias(ALIAS);
}


void setup() {
  /* Add Event listeners */

  /* Call onMsghandler() when new message arraives */
  microgear.on(MESSAGE, onMsghandler);

  /* Call onFoundgear() when new gear appear */
  microgear.on(PRESENT, onFoundgear);

  /* Call onLostgear() when some gear goes offline */
  microgear.on(ABSENT, onLostgear);

  /* Call onConnected() when NETPIE connection is established */
  microgear.on(CONNECTED, onConnected);


  Serial.begin(115200);
  Serial.println("Starting...");

  /* Initial WIFI, this is just a basic method to configure WIFI on ESP8266.                       */
  /* You may want to use other method that is more complicated, but provide better user experience */
  if (WiFi.begin(ssid, password)) {
    while (WiFi.status() != WL_CONNECTED) {
      delay(500);
      Serial.print(".");
    }
  }

  Serial.println("WiFi connected");
  Serial.println("IP address: ");
  Serial.println(WiFi.localIP());

  /* Initial with KEY, SECRET and also set the ALIAS here */
  microgear.init(KEY, SECRET, ALIAS);

  /* connect to NETPIE to a specific APPID */
  microgear.connect(APPID);
  pinMode(LED, OUTPUT);
}

void loop() {

  /* To check if the microgear is still connected */
  if (microgear.connected()) {
    Serial.println("connected");

    /* Call this method regularly otherwise the connection may be lost */
    microgear.loop();


  }
  else {
    Serial.println("connection lost, reconnect...");
    if (timer >= 5000) {
      microgear.connect(APPID);
      timer = 0;
    }
    else timer += 100;
  }
  delay(100);
}
ส่วนการต่อ LED ให้ไปดูต่อบทความ https://www.poolsawat.com/no-off-led-with-nodemcu/
เมื่อดำเนินการขั้นตอนที่กล่าวมาเสร็จก็ลองทดสอบ
หลักการทำงานของ Netpie กับ ESP8266
- Run Program บน NodeMCU ต่อ LED ไว้
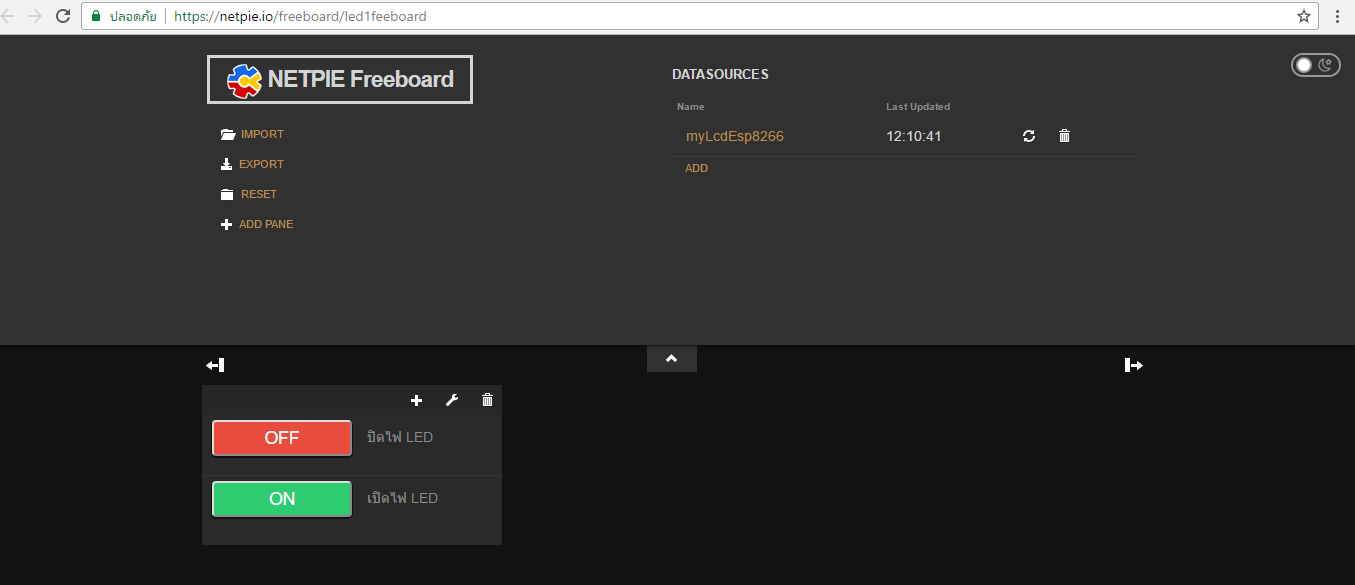
- จะสั่งการทำงานจากหน้า Freeboard Dashboard ที่ Netpie มีบริการไว้ให้

- กดปุ่มปิด ไฟจะติด กดปิดไฟจะดับ
- ถ้าการทำงานไม่เป็นไปตามนี้ ให้ไปตรวจสอบ ค่าที่ #defind appid,key,secret อีกครั้ง