สั่งงานเปิด-ปิดไฟ ด้วย Board ESP8266 NodeMCU v.3
กระแส IOT มาแรงมาก ได้ยินแบบนี้ก็ต้องเริ่มมองหาอุปกรณ์มาเล่นบ้าง
สำหรับมือใหม่ก็ต้องมองหาชุดอุปกรณ์ง่าย ๆ ราคาถูกมาลองเล่นกันก่อน
ผมเองก็เป็นมือใหม่ในเรื่องนี้ เริ่มต้นก็ต้องศึกษาหาข้อมูลก่อนไปเจอ ESP8266 NodeMCU
คิดว่ามัน่าจะดี ข้อดีของบอร์ดนี้คือ มี WIFI ในตัว
อุปกรณ์ที่ต้องเตรียม
- NodeMCU (ตามตัวอย่างนี้จะใช้ Version 3)
- สายไฟ จัมเปอร์ Jumper Wire M-F 20 cm 2 เส้น
- Breadboard 840 holes
- หลอด LED
- สาย USB 2.0
- Computer ที่ติดตั้งโปรแกรม Arduino IDE เรียบร้อยแล้ว (Download ได้ที่นี่)
-
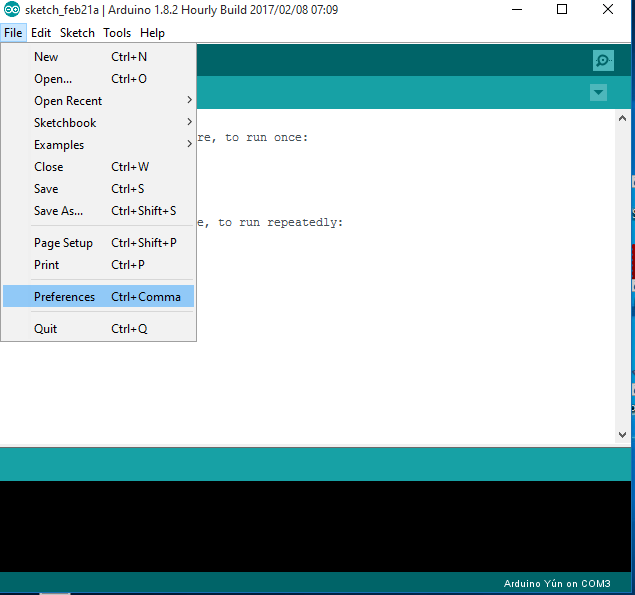
- ขั้นแรกเปิด arduino IDE ขึ้นมาไปที่เมนู File -> Preferrence
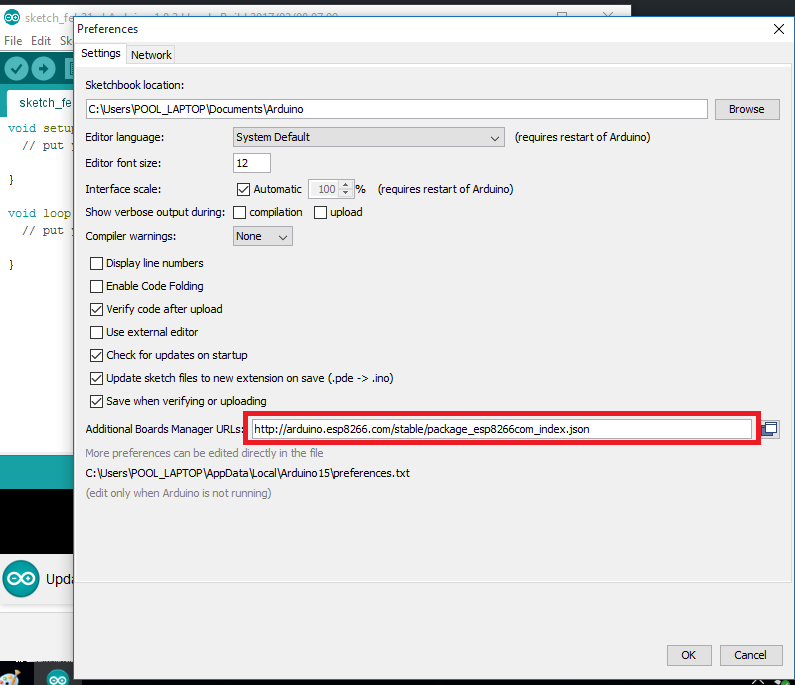
- ช่องให้ใส่ “http://arduino.esp8266.com/stable/package_esp8266com_index.json” เข้าไปกด OK
- ไปที่เมนู Tools > Board > Boards Manager…
- พิมพ์คำว่า 8266 แล้วกด Install รอจนกว่าจะเสร็จ
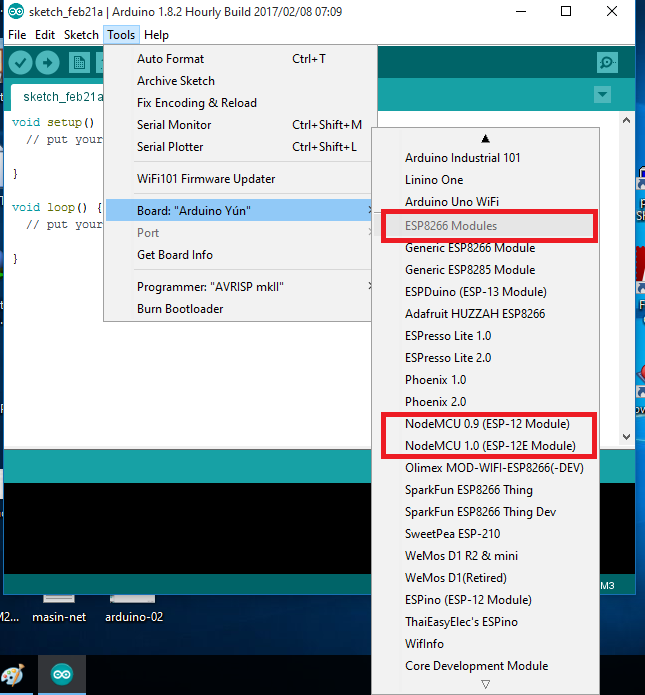
- ติดตั้งเสร็จตรวจสอบ Boards ESP8266 ว่าจะแสดงดังภาพ
-
- พิมพ์คำว่า 8266 แล้วกด Install รอจนกว่าจะเสร็จ
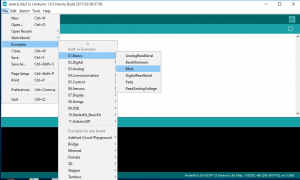
- เริ่มการเขียนโปรแกรมควลคุมให้ไฟ เปิด ปิด เบื้องต้น lab นี้ตัว arduino ide จะมีเตรียมไว้ให้แล้วให้เราเลือก File > Example > Basic > Blink
-
-
int led = D4;
void setup() {
  pinMode(led, OUTPUT);     // Initialize the LED_BUILTIN pin as an output
}

// the loop function runs over and over again forever
void loop() {
  digitalWrite(led, LOW);   // Turn the LED on (Note that LOW is the voltage level
                                    // but actually the LED is on; this is because
                                    // it is acive low on the ESP-01)
  delay(1000);                      // Wait for a second
  digitalWrite(led, HIGH);  // Turn the LED off by making the voltage HIGH
  delay(2000);                      // Wait for two seconds (to demonstrate the active low LED)
}
-
- ต่อสาย USB เชื่อม Computer กับ Board NodeMCU เพื่อทำการ Upload Program ที่ Complie สำเร็จ เข้าไปที่ Board NodeMCU
- ผลการทำงาน
- ขั้นแรกเปิด arduino IDE ขึ้นมาไปที่เมนู File -> Preferrence