การพัฒนาเว็บไซต์ด้วยชุด framework ต่าง ๆ จะให้ได้รับความนิยมของ framework นั้น ๆ ต้องมีความพร้อมในเรื่องการจัดการ view ก็คือเครื่องมือการพัฒนาในส่วนของงานการแสดงผลของ data ต่าง ๆ การที่ laravel มาพร้อมกับ blade template engine นี้ถือว่าครบเพียบพร้อม เหมาะแก่การใช้งานเป็นอย่างมาก บทความนี้จะพาไปรู้จักการใช้งาน blade template engine นี้กันว่ามีการทำงานร่วมกับ laravel อย่างไรได้บ้าง
การใช้งาน Blade เพื่อ displaying data จาก controller
การที่จะนำค่าที่ผ่านกระบวนการทำงานจาก controller ไปที่ views (*.blade.php) โดยไฟล์ *.blade.php ทั้งหมดจะถูกจัดเก็บไว้ที่ resources/views/*
- สร้างไฟล์ {viewname}.blade.php ตัวอย่าง views/example/datatype.blade.php
<html>
<body>
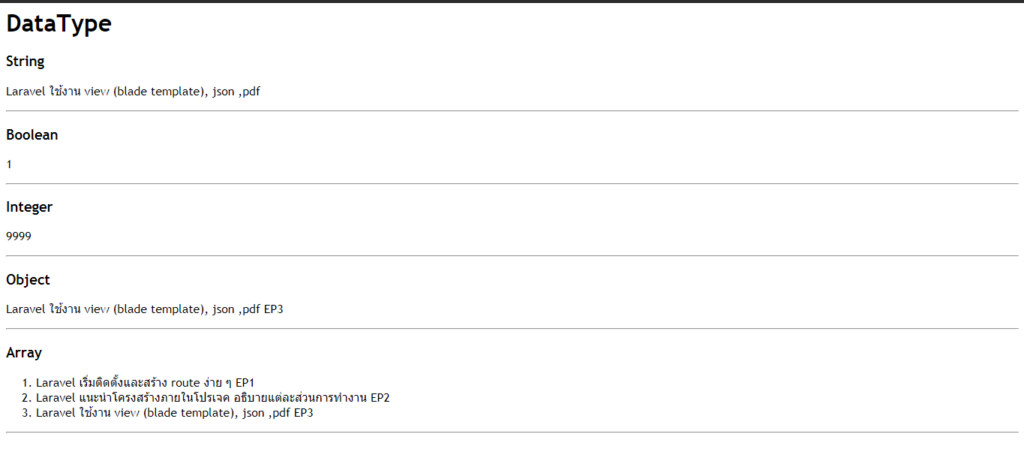
<h1>DataType</h1>
<h3>String</h3>
<p>{{$string}}</p>
<hr />
<h3>Boolean</h3>
<p>{{$boolean}}</p>
<hr />
<h3>Integer</h3>
<p>{{$integer}}</p>
<hr />
<h3>Object</h3>
<p>{{$object['content']}}</p>
<hr />
<h3>Array</h3>
<p>
<ol>
@foreach($array as $index=> $item)
<li>{{$item['content']}}</li>
@endforeach
</ol>
</p>
<hr />
</body>
</html>
- แก้ไขไฟล์ routes/web.php กำหนด view(‘datatype’,[?]) กำหนด parameter data ที่จะส่งไปที่ view ใน arg ที่ 2 [?]
Route::get('/datatype', function () {
  return view('/example/datatype', [
    'string' => 'Laravel ใช้งาน view (blade template), json ,pdf',
    'boolean' => true,
    'integer' => 9999,
    'object' => [
      'content' => 'Laravel ใช้งาน view (blade template), json ,pdf EP3',
      'author' => 'poolsawat'
    ],
    'array' => [
      ['content' => 'Laravel เริ่มติดตั้งและสร้าง route ง่าย ๆ EP1'],
      ['content' => 'Laravel แนะนำโครงสร้างภายในโปรเจค อธิบายแต่ละส่วนการทำงาน EP2'],
      ['content' => 'Laravel ใช้งาน view (blade template), json ,pdf EP3'],
    ]
  ]);
});
- ดูผลลัพธ์ที่ http://localhost:8000/datatype
การใช้งาน blade ในกรณีต้องการใช้งาน control structures (IF ,ELSE ,SWITCH ,LOOP (for ,foreach ,while) ต่าง ๆ เหล่านี้ ทำอย่างไร
ในบางครั้ง บางกรณีที่ต้องการตะเช็คเงื่อนไขในการที่จะแสดงผลของ data หรืออยากที่จะแสดงผลค่าที่เป็นในลักษณะชุดข้อมูล (array) ทาง blade ก็มีคำสั่งมาให้พร้อมแล้ว โดยการที่จะเรียกคำสั่งนั้น จะมี tag @ ตามด้วย name เช่น @if ,@for เป็นต้น
- สร้างไฟล์ views/example/control.blade.php
<!DOCTYPE html>
<html lang="en">
<body>
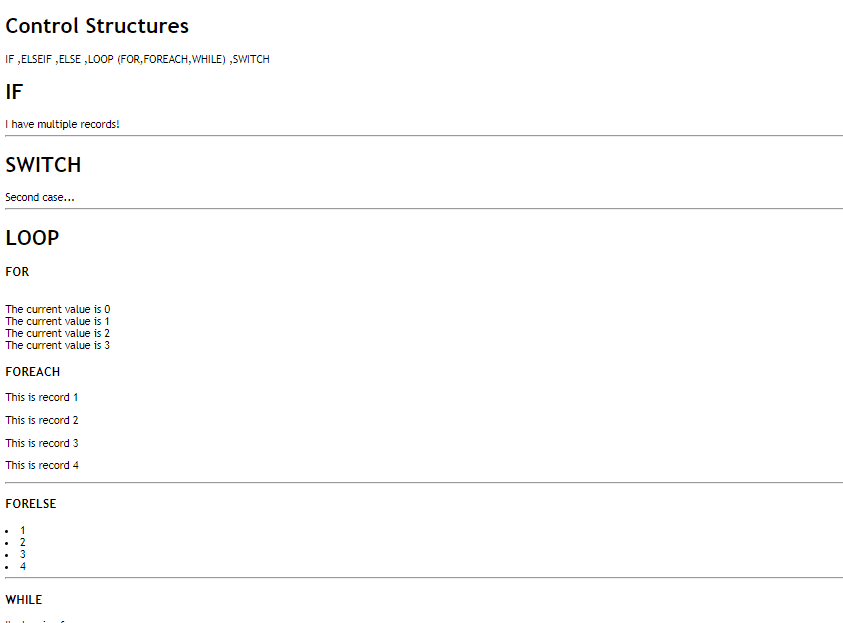
<h1>Control Structures</h1>
<p>IF ,ELSEIF ,ELSE ,LOOP (FOR,FOREACH,WHILE) ,SWITCH</p>
</body>
<h1>IF</h1>
@if (count($records) === 1)
I have one record!
@elseif (count($records) > 1)
I have multiple records!
@else
I don't have any records!
@endif
<hr />
<h1>SWITCH</h1>
@switch($case)
@case(1)
First case...
@break
@case(2)
Second case...
@break
@default
Default case...
@endswitch
<hr />
<h1>LOOP</h1>
<h3>FOR</h3>
@for ($i = 0; $i
< 4; $i++) <br />The current value is {{ $i }} @endfor
<h3>FOREACH</h3>
@foreach ($records as $rec)
<p>This is record {{ $rec }}</p>
@endforeach
<hr />
<h3>FORELSE</h3>
@forelse ($records as $rec)
<li>{{ $rec }}</li>
@empty
<p>No users</p>
@endforelse
<hr />
<h3>WHILE</h3>
@php
$i = 0
@endphp
@while ($i < 4) <p>I'm looping forever.</p>
@php
$i++
@endphp
@endwhile
</html>
- แก้ไขไฟล์ routes/web.php โดยเพิ่ม route “control-structures” เข้าไป
Route::get('/control-structures', function () {
  return view('example/control', [
    'records' => [1, 2, 3, 4],
    'case' => 2
  ]);
});
- ดูผลลัพธ์ที่ http://localhost:8000/control-structures
การใช้งาน blade กับการทำ component แยกส่วน
framework ที่ได้รับความนิยมในปัจจุบัน React , Angular ,Vue มีจุดเด่นเรื่องการทำ Component management โดยทั้งสิ้น Laravel เองก็มี concept นี้ด้วยเช่นกัน (ทีมเดียวกับที่พัฒนา Vue) ถือเป็นข้อดีอีกอย่างที่อยากแนะนำให้ใช้งาน laravel
- สร้างไฟล์ views/example/component.blade.php , views/components/alert.blade.php ,views/components/message.blade.php ,views/components/message-slot.blade.php ตาลำดับ
<!-- views/example/component.blade.php -->
<!DOCTYPE html>
<html lang="en">

<body>
  <h1>Component</h1>
  <h3>empty data</h3>
  @component('components/message',[])
  @endcomponent
  <hr />
  <h3>has data</h3>
  @component('components/message',['name' => 'poolsawat.com'])
  @endcomponent
  <hr />
  <h3>append slot</h3>
  @component('components/message-slot',[])
  <div>element slot 1</div>
  <div>element slot 2</div>
  @endcomponent
  <hr />
  <x-alert />
</body>

</html>
<!-- views/components/alert.blade.php -->
<h1>x-{component}</h1>
<!-- views/components/message.blade.php -->
<h2>
  @if (empty($name))
  component message ...
  @else
  component message {{$name}}
  @endif
</h2>
<!-- views/components/message-slot.blade.php -->
<h2>
  component message append slot
  {{ $slot }}
</h2>
- แก้ไขไฟล์ routes/web.php เพิ่ม route “components”
Route::get('/components', function () {
  return view('example/component', []);
});
- ดูผลลัพธ์ที่

- components ของ laravel มีรูปแบบการเรียกได้ 2 วิธี
- @component(‘components/alert’,[]) @endcomponent สามารถเรียกได้แบบนี้จากหน้า views
- <x-alert /> สามารถเรียกได้แต่ต้องมีไฟล์ app/View/Components/Alert.php โดย genarate Component ได้ด้วยคำสั่ง artisan package นี้
php artisan make:component Alert
<?php

namespace App\View\Components;

use Illuminate\View\Component;

class Alert extends Component
{
    /**
     * Create a new component instance.
     *
     * @return void
     */
    public function __construct()
    {
        //
    }

    /**
     * Get the view / contents that represent the component.
     *
     * @return \Illuminate\View\View|string
     */
    public function render()
    {
        return view('components.alert');
    }
}
เหล่านี้คือการเรียกใช้งาน blade template engine ง่าย ๆ ยังมีความสามารถอีกเยอะมาก ศึกษาเพิ่มเติ่มที่นี่