สำหรับนักพัฒนาเว็บไซต์ สาย Java น่าจะคุ้นเคยกับคำว่า Spring Framwork มันก็คือเครื่องมือพัฒนาโปรแกรมที่ต้องทำตามกรอบการทำงาที่กำหนดให้ โดยตัว Spring Framework นี้ก็มีแบ่งแยกออกเป็นหลายรูปแบบ 1 ใน นั้นก็คือ Spring MVC ที่เป็นเครื่องมือการสร้างเว็บ ที่รองรับแนวคิดแบบ MVC (Model , View ,Controller)
ถ้ามาพูดถึงเรื่องการพัฒนาเว็บที่มีการติดต่อระหว่าง Client กับ Server จึงต้องติดต่อผ่านการ Http Request คือสิ่งที่ Client เรียกร้องขอไปที่ฝั่ง Server และเมื่อฝั่ง Server ได้รับแล้วจะส่ง Http Response ตอบกลับมายังฝั่ง Client
ถ้าสมมติสร้างเว็บไซต์มา 1 เว็บด้วย Spring MVC และอยากจะตรวจสอบ Authentication การเข้าใช้งานแต่ละหน้าเว็บเราจะให้ไปใส่ Code การตรวจสอบสิทธิทุก ๆ หน้าเว็บมันก็เพิ่มงานของนักพัฒนาไปอีก และถ้ามันจะมีสิ่งที่จะสามารถเอา Code การตรวจสอบสิทธินี้มาไว้ที่เดียวได้มันก็จะดีไม่ใช่น้อย
Interceptors คืออะไร
Interceptor คือ Feature นึงใน Spring MVC ทำหน้าที่ดัก HTTP Request ที่เข้ามาก่อนที่ Controller ทำงานและหลัง Controller ทำงานได้
ตัวอย่างขั้นตอนการใช้งาน
สร้าง Class ExampleIntercepter เพื่อ implements AsyncHandlerInterceptor ขึ้นมา 1 Class
package xxx.xxxx.xxxxx;
import javax.servlet.http.HttpServletRequest;
import javax.servlet.http.HttpServletResponse;

import org.springframework.web.servlet.AsyncHandlerInterceptor;
import org.springframework.web.servlet.ModelAndView;

public class ExampleIntercepter implements AsyncHandlerInterceptor {

	public void afterCompletion(HttpServletRequest arg0, HttpServletResponse arg1, Object arg2, Exception arg3) throws Exception {
		// TODO Auto-generated method stub

	}

	public void postHandle(HttpServletRequest arg0, HttpServletResponse arg1, Object arg2, ModelAndView arg3) throws Exception {
		// TODO Auto-generated method stub

	}

	public boolean preHandle(HttpServletRequest arg0, HttpServletResponse arg1, Object arg2) throws Exception {
		// TODO Auto-generated method stub
		// ******** Insert Code Check Before Load Web Page ***********
		return false;
	}

}
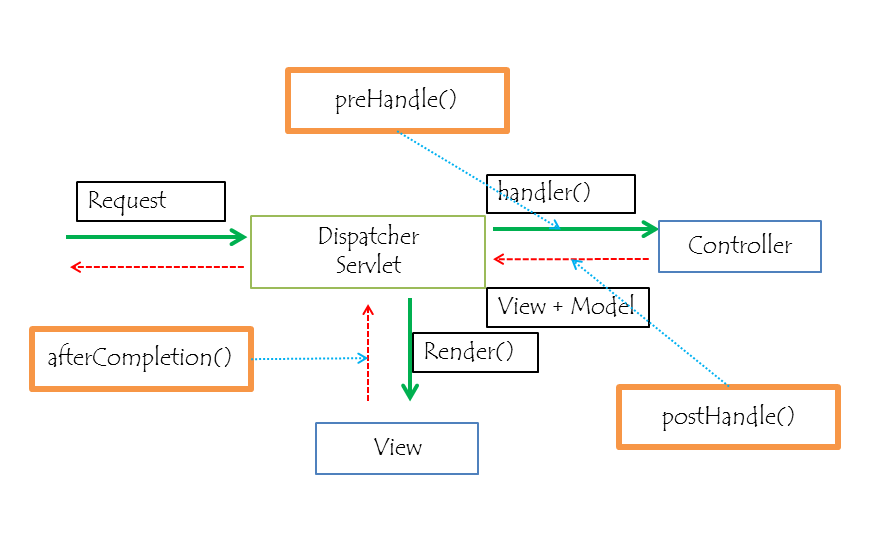
- preHandle จะถูกเรียกก่อนที่ Controller ทำงาน
- postHandle จะถูกเรียกหลังจาก Controller ทำงาน
- afterCompletion จะถูกเรียกหลังจาก Render View เรียบร้อยแล้ว
จากนั้นเพิ่มโค๊ด เข้าไปในไฟล์ dispatcher-servlet.xml
<?xml version="1.0" encoding="UTF-8"?>
<beans xmlns="http://www.springframework.org/schema/beans"
	xmlns:context="http://www.springframework.org/schema/context"
	xmlns:xsi="http://www.w3.org/2001/XMLSchema-instance" xmlns:mvc="http://www.springframework.org/schema/mvc"
	xmlns:tx="http://www.springframework.org/schema/tx" xmlns:p="http://www.springframework.org/schema/p"
	xsi:schemaLocation="
 http://www.springframework.org/schema/beans
 http://www.springframework.org/schema/beans/spring-beans-4.0.xsd
 http://www.springframework.org/schema/context
 http://www.springframework.org/schema/context/spring-context-4.0.xsd
 http://www.springframework.org/schema/mvc
 http://www.springframework.org/schema/mvc/spring-mvc-4.0.xsd
http://www.springframework.org/schema/tx
http://www.springframework.org/schema/tx/spring-tx-4.0.xsd">

	<context:component-scan base-package="xxx.xxxx.xxxxx" />

	<mvc:resources mapping="/asset/**" location="/asset/"
		cache-period="10000" />
	<mvc:default-servlet-handler />

	<tx:annotation-driven />

	<bean
		class="org.springframework.web.servlet.view.InternalResourceViewResolver">
		<property name="prefix">
			<value>/jsp/</value>
		</property>
		<property name="suffix">
			<value>.jsp</value>
		</property>
	</bean>

        <!-- Code interceptors config-->
	<mvc:interceptors>
		<mvc:interceptor>
			<mvc:mapping path="/**" />
			<bean class="xxx.xxxx.xxxxx.ExampleIntercepter" />
		</mvc:interceptor>
	</mvc:interceptors>
</beans>
options เพิ่มเติม กรณีไม่ต้องการให้ Request บางตัวไม่ต้องผ่าน intercepter นี้ก็สามารถระบุได้
<mvc:interceptors>
		<mvc:interceptor>
			<mvc:mapping path="/**" />
			<mvc:exclude-mapping path="/login**" />
			<mvc:exclude-mapping path="/checkLogin**" />
			<bean class="xxx.xxxx.xxxxx.ExampleIntercepter" />
		</mvc:interceptor>
</mvc:interceptors>
จากโค๊ดนี้ต้องการให้ url ที่เรียกเข้า controller ที่มีชื่อ ด้วยคำว่า login,checkLogin สามารถผ่านไปได้ ไม่ต้องเข้า Intercepter